 Κυπριακό Κέντρο Περιβαλλοντικής Έρευνας & Εκπαίδευσης – Κυκπεε
1) Sand-filled bottles
Materials:
– Clear glass or plastic bottles, -Sand
– White glue or bottle cap
-Newspaper, – Wax paper
– Colored chalk (as many different colors as you like)
– Stick or pencil, – Cutting board
Time required:
30 minutes
Instructions:
Cover the work surface with newspaper. After place a sheet of wax paper on a cutting board. Place some sand on the wax paper and roll a piece of colored chalk across the sand until the sand is completely changed to that color.
Carefully lift the wax paper and gently shake the sand to the center of the wax paper. Hold both ends of the paper up to use it as a pour spout to pour the colored sand into the bottle. You can use a funnel if you find it easier.
Repeat these steps until you have several colors of sand layered in your bottle.
If you have a cap for your bottle, be sure to fill it completely with sand and press down firmly on the sand to compact it. Place cap on tight. Then fill to the top with glue and let dry.
Your sand-filled bottle is ready now.
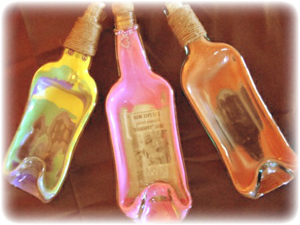
2) Message in a bottle (decorative)
Materials:
– Glass bottle with cork
– Letter
– Sugar
– Candy
– Red Ribbon
– Scissors
Time required:
20 minutes
Instructions: Use an empty glass bottle. Remove all labels from the bottle, wash it and dry it. Write a note or a letter on to a parchment paper. Roll up letter tight enough to fit inside the opening of the bottle. Tie the letter with the thin red ribbon.
Pour enough sugar into the bottle (about 2 inches deep), or deep enough so that when the letter is placed inside the neck of the bottle, the top portion of the letter will remain in the neck. This way the letter can easily be removed.
Drop confetti, beads or craft jewels into the sugar. Insert the rolled letter into the neck of the bottle, make sure the long end of the ribbon is in the neck as well, and insert cork. Tie silver ribbon around the neck of the bottle for decoration.
The decorative bottle is ready. Enjoy!
3) Recycled Easter Basket
 Materials:
– Soda Pop Bottle
– Chenille Stems
– Easter Grass
– Craft Glue or Hot Glue Gun and Glue Sticks
– Utility Knife
– Scissors
– Embellishment Items (Such as Ribbon, Felt, Craft Foam, Beads, Etc)
Time required:
20 minutes
Instructions: For this easter basket, a sode pop bottle is recommended, but you can modify this project to use any size bottle.
Start out by using the utility knife to cut the bottom 2- to 3-inches off of the plastic bottle. This will be your basket, so you have to decide about its depth (can make it as deep or as shallow as you like).
Next, use the utility knife to make two small slits on the side of the basket, directly across from each other and about a half to one inch down from the top. Poke an end of the chenille stem through each slit so about an inch hangs into the inside of the basket. Fold up the ends of the chenille stem and secure them with a little bit of glue.
Now you can decorate it! You can startI by covering the top edge with a ribbon.. Decorate the outside of the basket as you desire.
Finally, Fill the basket with a little bit of Easter grass or comfetti. Your basket is ready now! Enjoy!


