 Κυπριακό Κέντρο Περιβαλλοντικής Έρευνας & Εκπαίδευσης – Κυκπεε
1) Tin can luminary craft
 Materials needed:
– Tin Can
– Plain Paper
– Pen or Pencil
– Duct or Masking Tape
– Nail
– Hammer
– Candle
Time Required:
45 minutes
Instructions: You can use any size can for this project. Wash your can well and remove the labels. Fill your tin can with water, leaving about an inch of room from the top edge. Put the can of water into the freeze and leave it until the water is frozen solid. The luminary will be made by tapping holes into the sides of the can with a hammer and nail (by having freezing water in the can it helps the can to keep it’s shape during this process).
Thus, once the water in your can is frozen, you are ready to make your luminary. You can also draw out a design and tape it around the can to help you for the creation of your luminary. Use the hammer and nail to tape holes into the can and ice. Follow the lines of your design, making sure to leave space between the holes. When your design is complete, remove your pattern and let the ice melt.
Finally, when you can is dry place a candle into the can and light it. Your luminary is ready! Enjoy!
2. Ladybug treasure holder craft
Materials needed: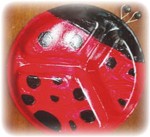
– Tuna Can
– Black Acrylic Paint
– Red Acrylic Paint
Time Required:
30 minutes
Instructions: Paint the tuna can black and set it aside and allow it to dry.
Take the lid of the tuna back and paint it as the photo below in order to create the ladybug’s head and wings. Set it aside to dry. The lid of the can will be the cover for your treasure holder.
When the can and the lid will be dry you can use your new treasure holder. Enjoy!
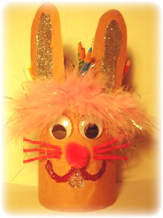
3. Rabbit pencil holder
 Materials needed:
– Tin can
– Glue
– Wiggly eyes
– Pom pom (for the nose)
– Brown paper bag
– Wikki stix or chenille stems/pipe cleaners
– Feathers
– Pen / Pencils
Time Required:
30 minutes
Instructions: Clean the recycled can and let it dry. After, glue a brown paper bag to the recycled container. (If you are using a tin can, be sure to leave about 1/2 inch of paper at the top of the tin can, so you can fold it over the rim.)
Glue the wiggly eyes on. Glue a pom pom for the nose.Draw an ear shape on the paper bag. Fold the paper in half before cutting, so you will make two ears.Glue the ears towards the top of the container. Press 6 short wikki stix on the face or glue on chenille stems/pipe cleaners for whiskers.Glue the feathers under the ears.
Fill the Spring Bunny Pencil Holder with pencils. Your pencil case is now ready!


